| ON THIS PAGE:
Auto focus limitations
Focusing help
Manual focus
Interview focus
Following a moving target
In need of some Z1 or FX1
camera training? We offer
one-to-one personal training and
training for groups.
More info...
|
 PART 2: FOCUS PART 2: FOCUS
by Christina Fox
There are two ways of getting your pictures in focus. You can leave the focus on AUTO and let the camera do it for you or you can adjust it manually.
THE TROUBLE WITH AUTO FOCUS ... is that it doesn't work well under the following conditions:
- When the subject is not in the centre of the picture (particularly when there are moving objects in the background)
- In low light conditions
- If there is a bright light behind the subject (e.g. a window)
- When the subject is bright (e.g. a car with its head lamps on)
- When the subject is of low contrast - walls, the sky
- If the subject is made up of fine repetitive patterns
- If the subject is behind vertical bars or a chain link fence
- When another subject passes between the camera and the point of interest
The good news is that Sony have provided two extra features to help you with manual focusing... |
FOCUSING HELP …
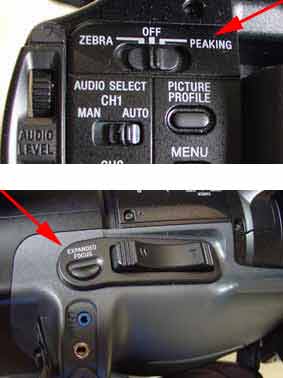
1. PEAKING works by emphasising sharp edges
by giving them a little added zing (in the viewfinder and LCD screen
only). Peaking is usually white and clings to sharp edges to emphasise
they are in focus. If you are finding it difficult to see the peaking
then you can change its colour (red, white or yellow) and level (high,
medium and low) in the camera set menu.
I recommend you switch the Peaking on and change it to RED and HIGH
in the CAMERA SET MENU. Peaking works whether you are recoding or not
which is helpful. However, it is not always easy to see on some subjects.
Remember it works by clinging to in focus EDGES. Faces don't tend to
have many hard edges (unless they are very wrinkled) so you may not
see peaking on a face. So....
2. The EXPANDED FOCUS button will zoom the
picture in further to help you check focus. However, this only works
in STBY mode
and is not available when recording.
Back to the top. |
MANUAL FOCUS
When you start to use the camera you will probably use auto focus. However, with all the above restrictions, I hope you'll want to use the manual focus all the time. Your pictures will look more professional once you get the hang of it.
- Set the FOCUS switch to MANUAL
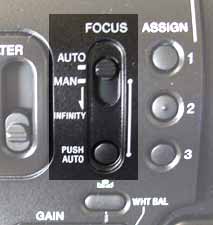
- Zoom in as close as you can to the subject (for a person zoom into their eyes)
- Press the EXPANDED FOCUS button to zoom the picture in further to ensure focus is correct.
- Turn the FOCUS RING , at the front of the lens, to get the picture into focus
- Zoom out to frame the shot.
ZOOM IN.... FOCUS.... FRAME UP
... Alternatively
- Set the FOCUS switch to MANUAL
- Zoom in as close as you can to the point of interest.
- Press the EXPANDED FOCUS button to zoom the picture in further to help you check focus.
- Push the PUSH AUTO button. This time the camera will momentarily go into AUTO FOCUS .
- Once in focus release the button to resume MANUAL focus mode.
- Zoom out to frame the shot.
Do be aware that these two techniques are not foolproof. Because these
sorts of lenses do not track perfectly (ie they will not stay in focus
on the point of interest if you zoom in and out repeatedly). The camera
uses look up tables to work out where they focus should be once it has
zoomed out and this method is not always 100% accurate. Which is why
- if you are shooting an interview try this method which does not require
zooming....
Back to the top. |
IF YOU ARE SHOOTING AN INTERVIEW…
Select manual focus
- Frame up a shot of your interviewee
- Tilt down to a shot of their chest (ie no distracting background in shot)
- Press and hold the PUSH AUTO until it finds the focus – this will take a few seconds
- Stop pushing the PUSH AUTO once you have the focus
- Tilt back up to frame your interview shot.
Back to the top. |
IF YOU ARE ON THE RUN, FOLLOWING A CONTRIBUTOR.
- Select manual focus
- Manually focus the lens to a distance of 1.4 metres (the hyperfocal
distance). As you turn the focus ring it will tell you once you are
focused 1.4m away.
- Zoom out as wide as you can go – this is important – and stay wide for the whole time you are recording
With this method you are focusing on what is called the HYPERFOCAL
distance. When you do this, the depth of field extends from half the
hyperfocal distance to infinity. In other words your subject will
stay in focus even if they move from 70cm from the lens - all the
way to infinity. However, this ONLY works if you stay zoomed out.
If you zoom in you will probably go out of focus.
If you want to know more about hyperfocal distance calculations I recommend you go to
http://dfleming.ameranet.com/hyperfocal.html
http://dfleming.ameranet.com/equations.html
http://www.nikonians.org/html/resources/guides/dof/hyperfocal2.html
©
2000 - 2010 Back to the top. |
- Move on to...
- Part 3: EXPOSURE - IRIS, ND AND ZEBRA
- Or back to...
- Part 1: GETTING STARTED
-
Need some help? We do video camera training.
-
Find out more about our one-to-one
Sony Z1 camera training.
We also offer in-company training
for groups of people.
|
|
|
| Christina Fox
|
