|
| urbanfox.tv > camera workbooks > Sony VX1000 > Part 2: manual operation |
|
ON THIS PAGE: Focus |
|
|||||||||||||||||||||||||||||||||||||||
FOCUS
There are two ways of getting your pictures in focus. You can leave the focus on AUTO and let the camera do it for you or you can adjust it manually. THE TROUBLE WITH AUTO FOCUS ... is that it doesn't work well under the following conditions:
MANUAL FOCUSWhen you start to use the camera you will probably use auto focus. However, with all the above restrictions, I hope you'll want to use the manual focus regularly.
ZOOM IN.... FOCUS.... FRAME UP ... Alternatively
[ Once the lens is in focus at the narrow end it should remain in focus no matter how far you zoom out - as long as the camera or your subject doesn't move. ] |
||||||||||||||||||||||||||||||||||||||||
WHITE BALANCELightbulbs, flouecsent tubes and the sun - all of us see these sources of light as white light . But our eyes are deceiving us, they all vary considerably in their colour. Our brains are very good at performing a white balance without us really noticing. However the camera has to be told what type of light it is working in - so that it can correctly reproduce what our eyes see. To understand the need to white balance you first have to understand colour temperature... If I put a poker in a fire it will start to glow "red hot" - if I put it in a furnace and really heat it up it will look as if it is "white hot". As the temperature of the poker rises the colour of light it emits changes. Red hot is pretty hot while white hot is very hot. There is a definite connection between the temperature of the metal and the colour of light it emits. This colour temperature connection is a way of scientifically quantifying the colour of the light source. Ok now think about a light bulb - inside is a filament (made of tungsten metal). When you switch on the electricity, a large current flows through a small filament, it gets hot and starts to glow. (ie It behaves like our poker). The colour temperature of tunsten light usually lies at around 3200 Kelvin. It is actually a reddish orange light. The sun is another main source of light. As you'd expect it is hotter than a light bulb! The temperature on the surfaceof the sun is 5800°K, while inside and especially at its core, it reaches millions of degrees. However, the light that it produces must firstly pass through its atmosphere and then through the atmosphere of the earth before it reaches earth's surface. So daylight consists of a mixture of the light that comes directly from the
Sun with the indirect light that comes from diffusion and reflection, caused
by earth's atmosphere and clouds. This makes colour temperature on the ground
pretty variable from as low as 2000 Kelvin up to 20,000 Kelvin. The table below
shows the range of temperature possible for daylight and the conditions that
effect it.
So different sources of light are different colours. Why is this important? Well, we have to tell the camera what colour of light it is working in so that the picture it records looks something similar to what our eyes see. To do this we need to do a white balance. When the camera does a white balance - it analyses the spectrum of colours hitting a white piece of paper. It juggles these until the white looks white. In areas with a single source of light this is pretty simple. When we have mixed sources of light we can have problems. A camera white balanced in tungsten light (3200 Kelvin) will give my complexion a blue tint if I am then lit by the sun through the window. Alternatively a camera white balanced in daylight on an average day (around 5600 Kelvin) will make me look like a red lobster if you switch on any tungsten lamps. Well maybe looking a little sun burnt might make me look healthy but with blue skin I'll look deathly. Getting skin tone to look accurate on screen is always important. To over come the problems of mixed light a colour correction gel is used to alter the Kelvin output of the different light source. It is usual (because it is often quicker) to try and alter tunsten lights to match daylight. A blue gel over a 3200 Kelvin light source will ensure it matches sunlight at 5600 degree Kelvin. But, it is also possible to use an orange gel over windows to alter sunlights to match indoor tunsten light - you just need more time and plenty of gaffa tape. To make white objects appear white to the camera we do a WHITE BALANCE. To do a manual white balance the camera must be shown something white (usually a piece of paper) lit by the light source you will be working in. Beware of white balancing in the wrong light source e.g. by a window and then shooting the interview in a corner of the room lit by tungsten light. Whatever light falls on your subject should also fall on the white paper you use to perform a white balance.
WHEN SHOULD YOU PERFORM A MANUAL WHITE BALANCE?
SETTING THE WHITE BALANCETurn the HOLD/AUTO LOCK switch to the middle position. Then press the WHT BAL button underneath the rear screen. Each time you press the WHT BAL button one of the symbols below will appear...
HOW TO DO A MANUAL WHITE BALANCE
|
||||||||||||||||||||||||||||||||||||||||
EXPOSUREWe have to be able to control the amount of light that passes through the lens and goes into the camera. If there is too much light the picture is said to be over exposed - too little light and it will be under exposed. We can control the amount of light coming through the lens by the use of an IRIS or APERTURE. This works in the same way as the iris (or pupil) of your eye: when you are in bright light the iris is made as small as possible (it 'stops down') to prevent too much light entering your eye, when you are in a darkened room your iris becomes as wide as possible ('opens up') to let in as much light as possible. Of course your brain does all this for you and is constantly adjusting your iris depending upon the prevailing light levels. Domestic and professional cameras allow you to operate the camera iris in manual or in automatic. However, professional users tend to operate in manual only, using the auto iris only to do an occasional 'spot check'. The AUTO EXPOSURE works by looking at the whole scene, averaging out the bright areas and dark areas and setting the exposure for this average. The problems start when something bright or dark comes into frame. e.g. If a white car drives across the frame the average light level of the scene will go up. The camera over compensates by stopping down the iris causing the surrounding picture to be under exposed. If a black car now drives past the average light level will go down and the iris will open up. Now the surrounding scene will be over exposed. This exposure "hunting" looks amateurish, is a dead give away that you're in auto AND is totally unnecessary. There are a selection of apertures to choose from when the camera is in manual exposure mode. Apertures are referred to as f-stops (or sometimes just "stops") - the smallest aperture is f11on most cameras (although some lens are able to offer even smaller apertures) which lets the least amount of light into the camera. The largest aperture is f1.6 which allows the maximum amount of light into the camera. The aperture sizes (f stops) available are:
SETTING THE MANUAL EXPOSURE
HOW DO I KNOW IF I'VE GOT THE EXPOSURE CORRECT?METHOD 1... METHOD 2... METHOD 3...
Zebra stripes are a device that puts diagonal lines into highlights in the viewfinder (not on to the tape! Just in the viewfinder). Zebra stripes appear in parts of the picture that are 70% bright or above. When you see them in a picture it does not necessarily mean the picture is over exposed just that it is over 70% (and depending on the subject that can be good or bad). You should NOT see Zebras on a face - white caucasian faces are around 60% bright when correctly exposed. But, you should expect to see zebras in the day time sky. Working in the manual exposure mode you would be well advised to use the zebra. If you do see Zebras on a face - that is an indication that it is over exposed. Turn the exposure dial to stop down the iris and reduce light levels - until the Zebras just disappear. That said - you may see the odd flash of zebra on noses, foreheads and bald patches (places that tend to get a bit of a shine). A bit of face powder can usually sort these out. |
||||||||||||||||||||||||||||||||||||||||
TOO MUCH LIGHTDaylight on a clear sunny day can be around 35,000 lux. In very bright sunlight or in highly reflective places (i.e. where there is sand, water or snow) it is necessary to reduce the amount of light entering the camera so that the pictures do not become over exposed. There are several ways you can reduce the amount of light entering the camera.
HINTS
Another problem with very bright light is that it causes harsh shadows which will look almost black to the camera and unflattering to your subject. One way of reducing these shadows is to use a reflector (either a professional one made by Lastolite. A cheaper option is to use a notebook or newspaper. The trick is to get the light source to bounce off the reflector and into the shadows. |
||||||||||||||||||||||||||||||||||||||||
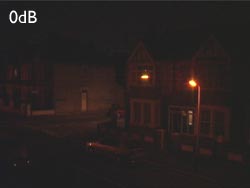
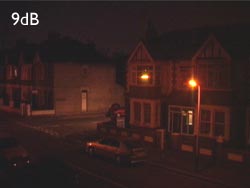
GAINWhen shooting in low light conditions (e.g. in poorly lit rooms and at night) the iris is will be fully OPEN at f1.6 but, the camera may still needs more light to produce a picture. In this case the EXPOSURE control can be used to switch in GAIN (up to 18dB) until the correct exposure is achieved The GAIN is an electronic method of increasing the brightness of your picture. There are seven gain levels to chose from:
As you dial in more and more gain you will notice that the picture becomes grainy or noisy. However, on balance you can usually add about 6dB and no one will really notice. |
||||||||||||||||||||||||||||||||||||||||
THE SHUTTERAbout 15 years ago when CCD chips were first launched they had a design fault. If the camera was pointed at a bright light, like a car head lamp, a red line (smear) would appear above and below the light source. The problem was partially solved by introducing a shutter. Today the red smear has virtually been eliminated by redesigning the CCD chips but unfortunately the shutter has remained as a gimmicky extra. The shutter speeds available are: 1/3, 1/6, 1/12, 1/25, 1/50, 1/75, 1/100, 1/120, 1/150, 1/215, 1/300, 1/425, 1/600, 1/1000, 1/1250, 1/1750, 1/2500, 1/3500, 1/6000, 1/10,000 (of a second). With the shutter on, the camera views the scene, the way your eyes would, if it was lit by a stroboscopic light such as at a disco (remember those!). Fast moving objects take on a juddery look. As the shutter speed increases, the amount of light entering the camera effectively decreases, so if you do want to use the shutter ensure you have sufficient light.
Professional camera operators use the shutter for three main reasons:
HOW DO YOU CHANGE THE SHUTTER SPEED?
|
||||||||||||||||||||||||||||||||||||||||
THE PROGRAM AE FUNCTIONThe main advantage of the PROGRAM AE FUNCTION is to enable the camera operator to make changes to the depth of field in the picture while keeping the exposure at the correct level. Depth of field is the distance between the nearest and farthest "in focus" objects in the picture. It is used as a tool of picture composition
Turn the HOLD/AUTO LOCK switch to the middle position. By pressing the AE button you will find that there are three modes to choose from.
The twilight mode enables the camera to shoot in very low light conditions. The iris is fully open, the shutter speed is locked at 1/50 and gain is added. |
||||||||||||||||||||||||||||||||||||||||
|
||||||||||||||||||||||||||||||||||||||||
|
|
||||||||||||||||||||||||||||||||||||||||
 PART
2:
PART
2: