|
| urbanfox.tv > camera workbooks > Sony PD150 and PD170 > Part 7: tapes |
|
ON THIS PAGE: |
|
DV OR DVCAMThis camera will record in DV or DVCAM mode. In DVCAM mode the camera spools the tape at a faster speed. So, a 60-minute miniDV tape will record 60 mins in DV mode, but only 40 mins of material in DVCAM mode. As DVCAM gives a shorter recording time compared to DV mode, why bother? DVCAM is more robust, reliable, gives improved error correction and, on the PD 150 and PD 170 it also allows you to have full control over timecode settings.. I advise using DVCAM whenever possible, because I beleive you should always record in the best quality available. To select between DV or DVCAM mode you have to enter the MENU...
|
|
|
This camera uses a small format cassette. Sony recommends you use the expensive tapes which have memory chips embedded into them. You will need these chipped tapes if you want to add a title, superimpose a title, make title searches or electronically label the cassette. They also allow you to use the END SEARCH function even if you remove the tape and put it back into the camera at a later date. However, if you're not interested in any of those functions then save your money. |
|
|
Loitering round the various camera forums, one important thing I've learn't about DV tapes is not to mix your manufacturers. Different tape manufacturers use different tape lubricants. By swapping and changing tapes, residues start to mix and stick to your record heads - the result is dropout. This is important because you won't see the dropout until you review your tapes and by then it may be too late to redo the shot. Remember this is advice from other users not from the manufacturers (who have a vested interest in your brand loyalty). This image shows a good example of dropout on a re-used tape. The fist image has not been completely recorded over by the second image and you get this ventian blind look. We used a cleaning tape to remove any gunk clogging the record heads to fix this problem. |
|
|
DON'T LEAVE TAPES:
HINTS AND TIPS
|
|
|
|
|
|
 PART
7: TAPES
PART
7: TAPES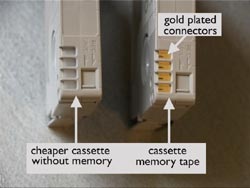 CHIPPED
TAPES
CHIPPED
TAPES MIXING
MANUFACTURERS
MIXING
MANUFACTURERS